
How to Safely Remove and Store Your Christmas Lights

I feel like there are three priorities when taking down Christmas lights:
Don’t fall off the ladder or the roof.
Somehow keep them from becoming a giant knot in the box.
Keep all the decorations from getting broken.
This may seem like a manageable list, but a lot of the time this chore can turn into a nightmare. Either something goes wrong this year, or you get the box out next year and realize that something went wrong in storage and now you need to re-buy perfectly good decorations because they won’t light up anymore. So here are some simple, manageable tips from your friendly neighborhood exterior cleaners who routinely remove and store lights from hundreds of houses a year.
Let’s tackle each item one at a time so you can easily skip to what you need.
Ladder Safety
Big on the ladder safety checklist is to carefully pick the spot where you are going to set up your ladder. Find a level, dry spot where your ladder has no wobble. If you need to put your ladder down on grass or another slippery surface, try putting down a rubber mat (like a welcome mat) or something else with some grip (like a big plywood scrap). If your ladder has rubber feet you may be able to flip over the pads to find spiky claws at the bottom that can dig into your grass for extra grip. You can use a stabilizer at the top of the ladder to keep it from sliding side to side against your house. It is often a good idea to have a partner down on the ground to steady the ladder and to help you hand things to and from the ground as needed so you don’t constantly need to climb up and down. Don’t ever climb a ladder when you are the only one home. There should be another adult on the property who is at least aware that you are up there and who can listen for shouting and cartoon crashing sounds.
When climbing the ladder, try to maintain three points of contact at all times. This means you have three limbs touching the ladder at any given moment. So rather than lifting both a hand and a foot at the same time to climb to the next rung, lift a hand first and get a good grip with that hand before you lift your foot. This way you have two feet and one hand on the ladder when you lift a hand, or two hands and one foot on the ladder when you lift a foot. Doing this helps you have a more secure balance and enables you to better catch yourself if you slip. It’s easy to climb a ladder like this when you aren’t carrying anything, but it gets more complicated once you are trying to bring something up or down because you can’t be using one hand to hold anything. To free up your hands, try putting your item over your shoulder (this works great for wreaths or loops of lights - but make sure the loops are small enough so your feet don’t get tangled), handing things down to a partner on the ground, or collecting things into a bucket that you can lower to the ground on a rope before you climb down. Once you start working at the top of your ladder, you can use a knee against the ladder as your third point of contact so that you can have both hands free. Just make sure you keep your hips inside the side rails of the ladder so that you can keep your balance and not cause the ladder to tip.
Before and after using your ladder, inspect it for damage. If your ladder is old, rusty, or rickety then it may not be safe to climb. Better to get a new ladder or borrow one from a neighbor, than to risk a fall. When you store your ladder make sure that it is fully dry so that it stays in good shape for next time.
In some cases you may be able to skip the ladder altogether, or use it very minimally by using an extension pole. Find or repurpose any kind of long pole (you might have one for painting, or for trimming trees), and attach a hook-like tool to the end of it. A paint roller handle works great! Carefully put the hook behind each string of lights and pull it away from the house a few feet at a time. Be sure to keep control of the hanging tail of lights as it comes down so that it doesn’t crash into your windows or other delicate fixtures. Once the lights are on the ground, you can safely coil them up! This technique works great for houses with tall roof peaks, or for areas where you didn’t feel very secure as you got the lights up. Don’t risk climbing up again without trying a go-go-gadget pole first.
Storing Lights Without Tangles
I swear Christmas lights become knotted in the box on their own over the summer no matter how carefully you coil them in there. This is the grown up equivalent of hiding a tooth under your pillow for the tooth fairy. Except instead of a quarter, your prize is two hours of enraged detangling. But you can still give yourself the best chance at having tangle-free lights next year by packing them away strategically. My big tip for this is to wrap the lights around something instead of just piling them in the box. You can keep the inner packaging that came with your lights and re-wrap them around their little plastic frames, or you can repurpose other things into a structure for your lights to wrap around. Hardware stores sell big plastic spools specifically for this purpose, but you may be able to use other things that are laying around your garage. You can wrap lights around a five gallon bucket (and then put hangers, extension cords, and other accessories into the bucket for storage), or you can use wood scraps, old plastic box lids, or other structured bits to spool your lights around. It’s better to spool each string individually if you can so that if any knots do form they will be easier to untangle.
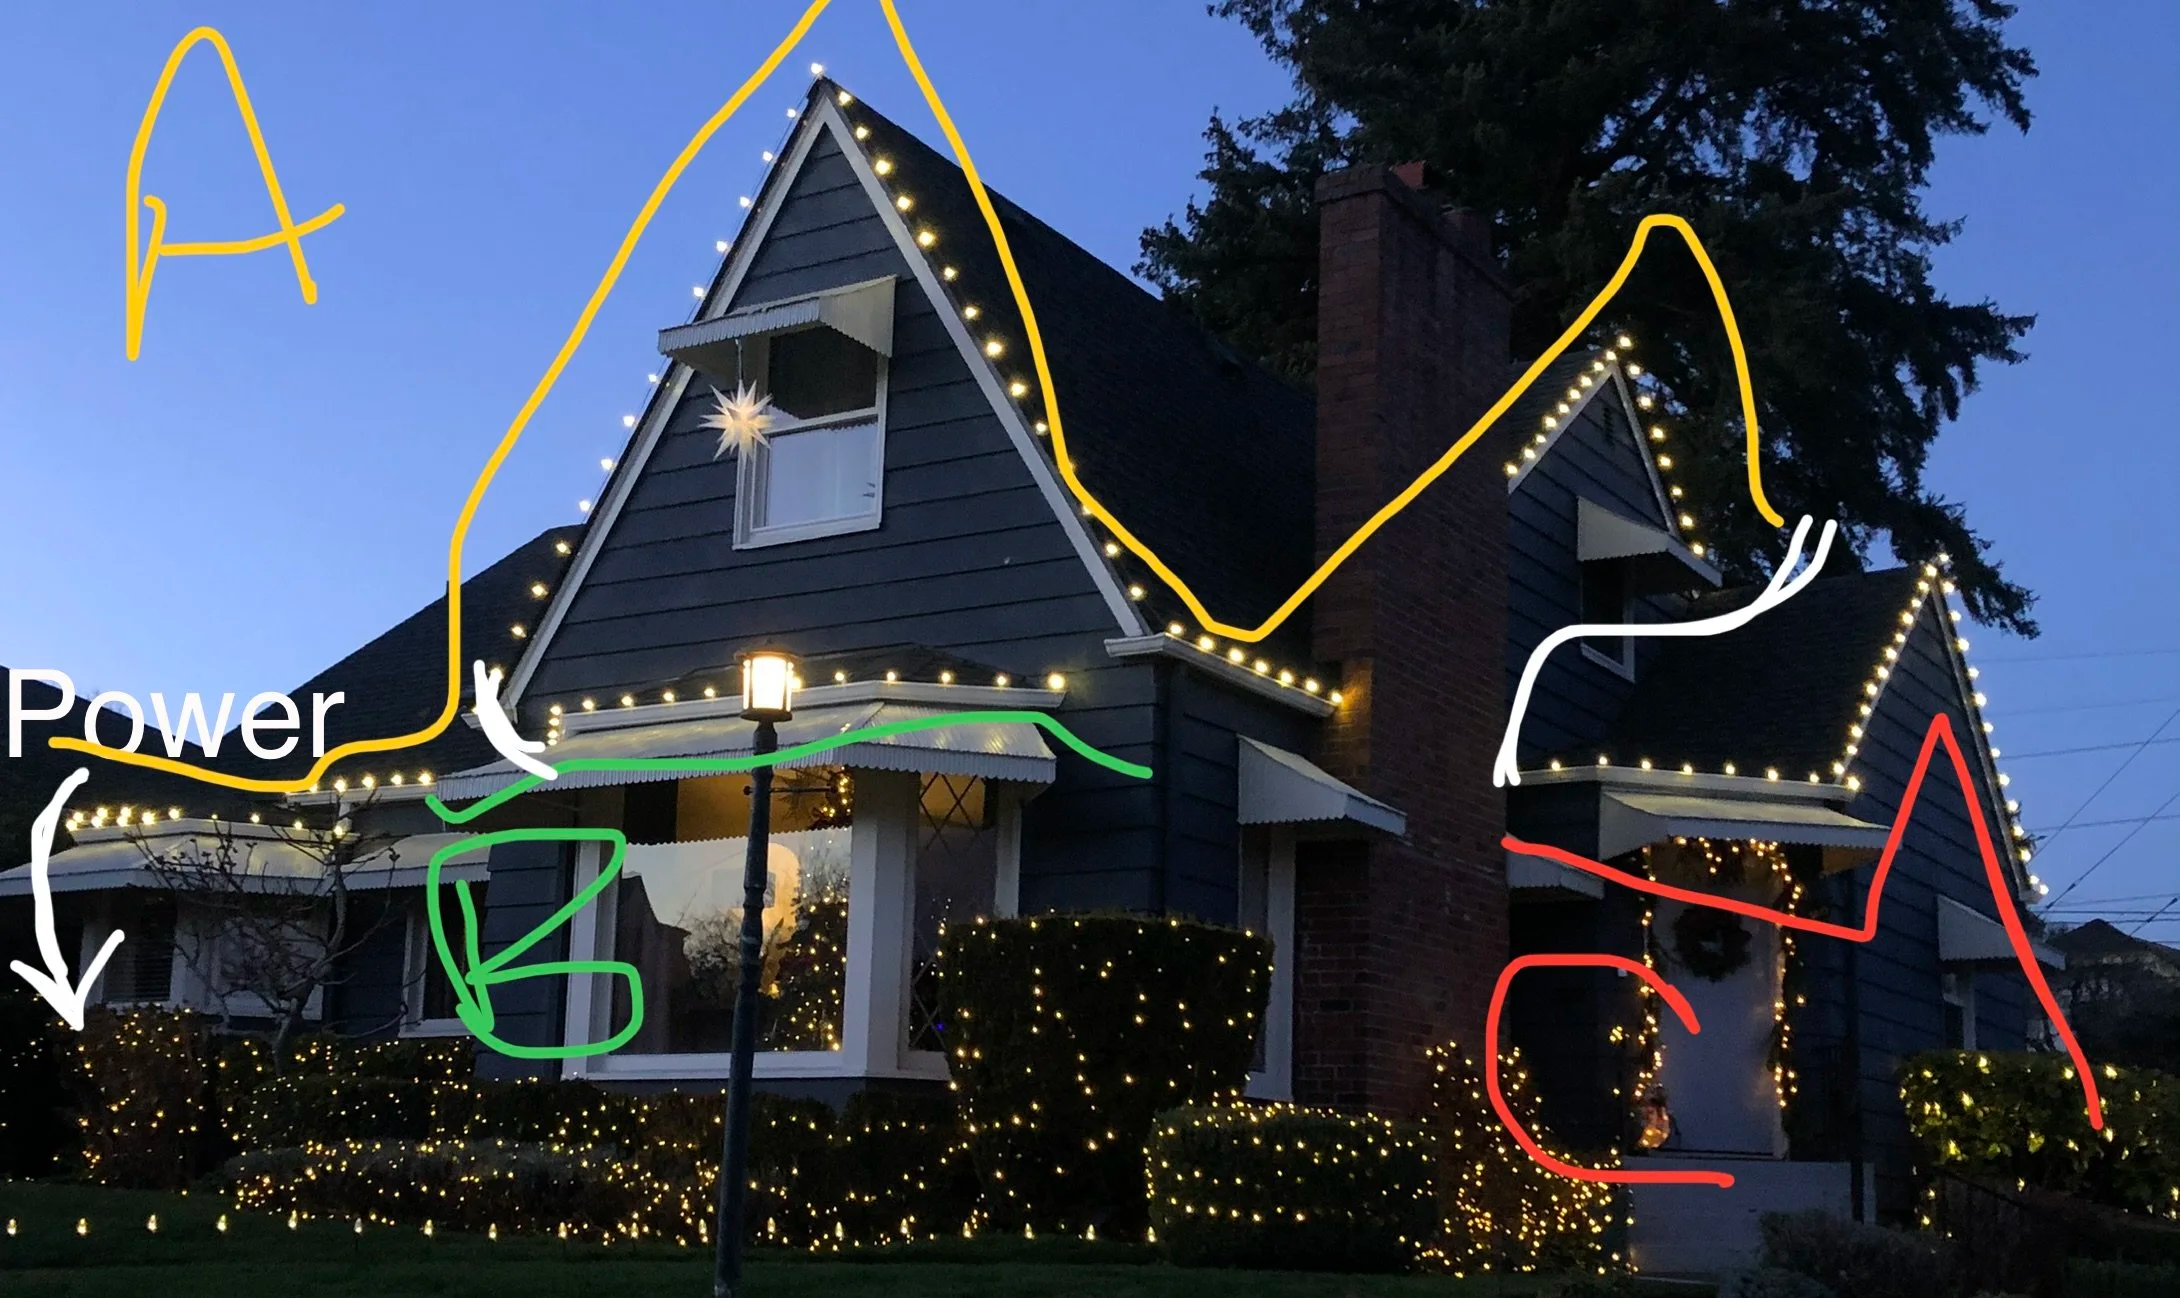
When you remove the lights from your house you can use electrical tape to label where each strand was hung. This will make it easier to re-hang the lights next year the same way you did this year. Pros like us take a picture of the house and make a light map, labeling where each strand goes and where the plugs are. Make sure to note where the power comes from and where any extension cords are run. You could print this picture out, or you could just save it in your phone and leave a notecard in the box of lights that says the date the picture was taken so that you can easily find it in your camera roll next year.
Protecting Your Decorations
Assuming that you aren’t going to store your lights in barrels that will be flung around by Donkey Kong, your decorations are less likely to be broken from rough handling and more likely to be broken from exposure to moisture. It’s pretty common for lights to be a little damp when they come down off of a house, or for moisture to collect on them when they are moved from the cold porch to the warmer storage space. Wait for the lights to dry, or dry them off before you pack them away. Store your lights in a container with some ventilation so that moisture doesn’t get trapped inside. You can easily make a ventilated box if you don’t have one by drilling a few holes in the lid of your existing box, or by storing it with the lid askew. Obviously this means that your storage space itself needs to be dry. Save any damp corners for indoor decorations that can be stored in fully enclosed containers. If you choose to wrap your lights around a big bucket like I suggested above, then you have built in ventilation because they are out in the open air! Any lights that sit over the summer with moisture collected against them are more likely to corrode and you may find a bunch of bulbs (or even entire strands) are burnt out when you go to re-hang them next year.
For our own Christmas lighting clients, we use 18 gallon storage bins with holes drilled in the sides for ventilation. We coil up the lights to fit the size of the container and use colored zip ties to keep each strand contained and tangle-free inside the box. Adding old paper grocery sacks or packing paper between each coil of lights also helps ensure that the coils don’t mix with each other and can absorb any rogue drops of moisture that end up inside the box.
If something goes wrong and you open your bin to a mold infestation, you may still be able to save your lights! For larger roof lights (C7 and C9 size), unscrew each bulb and spray dielectric spray in each socket, let it dry, and then screw the bulb back in. We like the dielectric spray made by WD-40, but there are plenty of versions of this product out there with the same basic chemical make up. Most Christmas lights do fine during the season hanging on your gutters and tree branches in the rain. The bigger moisture issue is during storage where water turns to vapor, and that vapor finds its way into the casings of LED bulbs. This will corrode the bulb or even freeze inside once the temps drop.
If You Don’t Want To Deal With Any of This
Maybe you hate hanging and removing your lights every year. Maybe you don’t have room to store them. Maybe your lights are old and you don’t want to buy new ones. Maybe you feel like your lights never look as good as your neighbors. If you are looking at these tips and just thinking “dang, I wish I didn’t have to deal with any of this stuff anymore” then don’t forget that you can have your lights professionally hung! Beautiful Day custom cuts professional grade LED lights to your exact roofline and handles all of the installation, removal, AND storage for your lights. Next year remember that you can avoid all of this hassle from the get-go with just a phone call to Beautiful Day :)
You can get a free instant quote on our website right here! Or you can give us a call at (253) 414-5304. We service the greater Tacoma area, including all of Pierce County, Federal Way, and Lacey.